

How To Install Laravel On Shared Hosting
How to Host a Laravel Projection on a Shared Hosting via CPanel

In this article, I'll be showing you how to host your Laravel projects on a shared hosting using the usual CPanel we all know and love. If y'all have a local server like WAMP or XAMPP, this would work to test it out before uploading to our CPanel.
1. Create a Laravel Project
The beginning step in this tutorial is to create a Laravel project if you don't have ane. Experience free to check out the official Laravel docs for how to create one if y'all don't already know how to.
2. Refactor the Directory Structure
Considering the servers on our shared hosting look for an index.php or alphabetize.html file at the root to execute, we demand to restructure our directory to arrive piece of work. Your public folder should expect similar this after a new installation:

What you want to do is move those files to the root directory of your application.
NB: If you already created a "symlink" to the storage folder in your project, please leave it in the public binder. I'll go back to why later. Also, delight remember NOT TO Affect the .htaccess file and exit it as it is in your project'south root; unless you thoroughly know what you're doing — in which instance, definitely brand a backup :).
If you've successfully moved the files, your directory structure should look similar this:

iii. Edit Files to Reflect our New Directory Structure
Although shared hosting servers look for the index.php file at the directory root to execute our application, Laravel isn't setup that manner past default. In lodge to make Laravel work with our new directory structure, we have to edit a couple of files so everything can run properly. The first file we'll be editing is the alphabetize.php file.

So the purpose of each line is commented in there by the lovely Laravel squad only only to analyze what nosotros've done here— since we've moved the index.php file to the root, we need to alter the path of these files so they can be found correctly. On lines 24 and 38, nosotros but remove the ../ in front of the directory names.
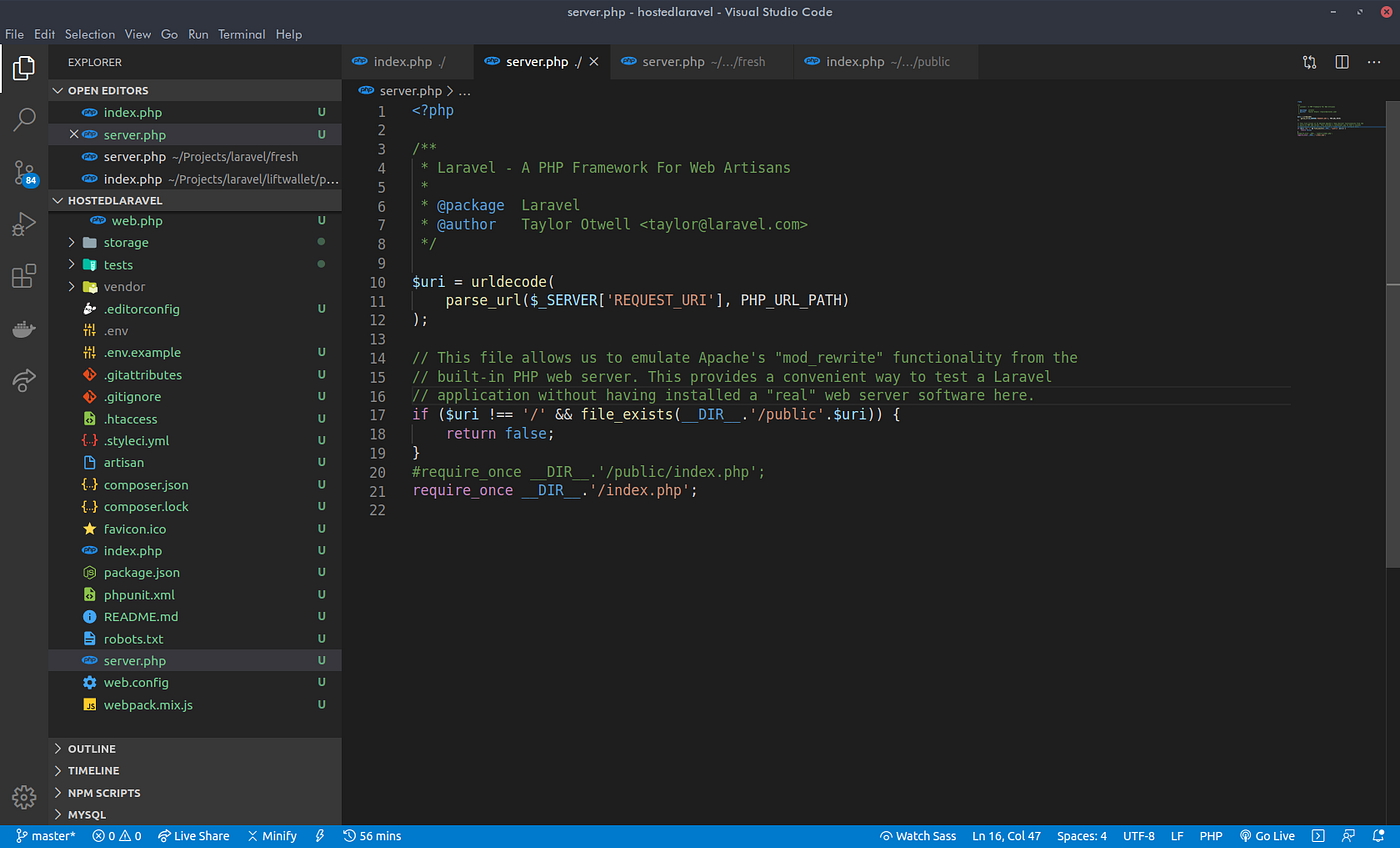
For newer versions of Laravel, we'd besides need to go to the server.php file which is usually in our root by default and brand a similar change to its content:
With this, our application should work properly if we examination information technology.
4. (Optional) Hack to make Storage work like the Default
It is necessary to create a symlink to our storage folder from our public folder in order to permit united states create human-friendly URLs for our resources and assets like pictures, videos and css . For those who may not know what "symlinks" are, here is a really expert tutorial for that.
Creating this symlink in Laravel is easy, but run this control from your terminal
php artisan storage:link When we create a symlink in our project the way we left it in step iii,, nosotros would notice that the links don't work quite the style they do in the default Laravel application — URLs to a file stored in our storage binder would have to be located using <host name>/public/storage/<file> rather than the <host name>/storage/<file> that we're used to.
At that place's a pocket-size hack to fix this, all we demand to do is create a route in our routes/web.php file.
Road::get('/storage/{extra}', function ($extra) { render redirect("/public/storage/$extra"); })->where('extra', '.*');
What this cake of code would practice is redirect all requests made to /storage/<anything> to /public/storage/<annihilation> without any hiccups.
5. We're done here
At this point, nosotros're done. What'southward left to do is upload this to our CPanel's htdocs, public_html, world wide web (whatever information technology's called there) or in the directory of the subdomain, doesn't matter if you do it via FTP or if you compress it and upload it directly
In order to configure your database connection, experience free to fix the database credentials in the .env file located at the root of your projection similar you would normally do and bear witness your cute projection to the world.
Decision
It's non a daunting task to take your Laravel projects hosted on a shared hosting via CPanel if you'd rather not use a Private Hosting. Feel free to leave any comments on this if yous liked it or have whatever questions or ran into hiccups along the manner and I'll gladly respond. Cheers!

Source: https://medium.com/backenders-club/how-to-host-a-laravel-project-on-a-shared-hosting-via-cpanel-d955d32c528e
Posted by: finniesirks1960.blogspot.com
0 Response to "How To Install Laravel On Shared Hosting"
Post a Comment